Table of Contents
ToggleKeeping houseplants alive shouldn’t feel like a second job. Between work trips, busy weekends, and life’s general chaos, it’s easy to let watering schedules slip, resulting in crispy leaves or root rot from overcompensation. Self watering systems solve that problem by automating the moisture delivery your plants need, letting you focus on enjoying them instead of babysitting them. Whether you’re a forgetful waterer or just want healthier, happier greenery with less daily fuss, understanding how these systems work will change your indoor gardening game.
Key Takeaways
- A self watering system for indoor plants automates moisture delivery through wicks or reservoirs, eliminating daily watering and reducing the risk of root rot and overwatering.
- Consistent, bottom-up hydration from self watering systems promotes healthier root development, discourages fungal issues, and improves overall plant growth compared to top watering methods.
- Commercial self watering planters range from $15–$80, while DIY options using bottles, drip tubing, or cotton rope cost under $40 and work equally well for budget-conscious gardeners.
- Setup requires priming the wick with thorough initial top-watering, using well-draining potting mix, and monitoring the first week to ensure proper moisture levels.
- Self watering systems work best for moisture-loving tropical plants like pothos, peace lilies, ferns, and African violets, but should be avoided for cacti, succulents, and orchids that require dry-down periods.
What Is a Self Watering System and How Does It Work?
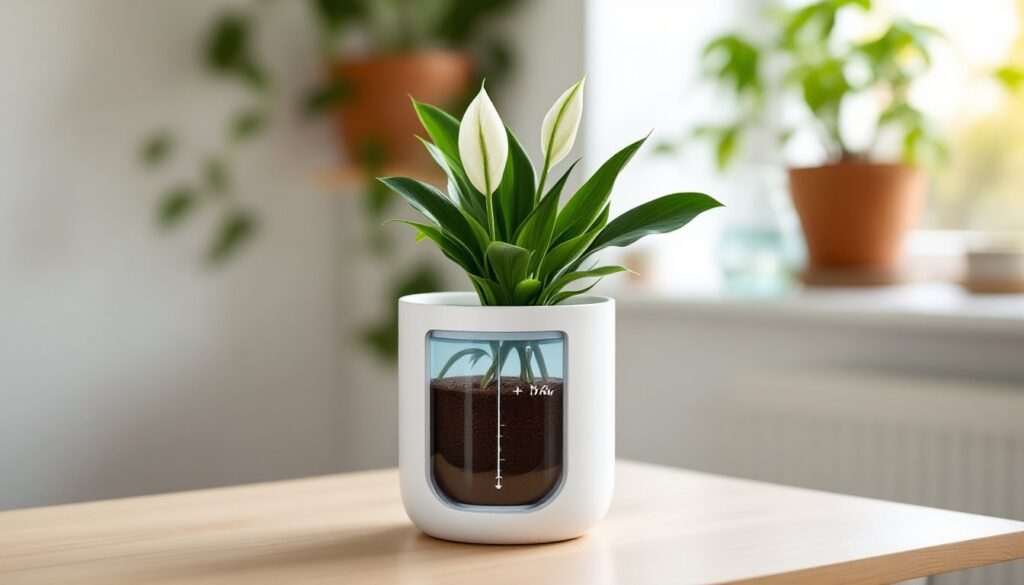
A self watering system delivers moisture to plant roots on demand, using capillary action, wicking, or a reservoir to maintain consistent hydration without daily manual watering. The core principle is simple: water sits in a separate chamber or bottom reservoir, and the plant draws it up as needed through wicking material, porous inserts, or exposed root contact.
Most systems feature two compartments, a growing chamber where soil and roots live, and a water reservoir below. A wicking cord (typically cotton, nylon, or fiberglass) runs from the reservoir into the soil, pulling moisture upward through capillary action as the soil dries out. Some designs use a porous clay cone or fabric insert that stays in contact with both water and soil.
The beauty here is passive regulation: when soil moisture drops, capillary tension increases, drawing more water through the wick. When soil is saturated, the draw slows or stops. This mimics natural groundwater uptake and reduces the risk of overwatering, one of the top killers of houseplants. Fill indicators or clear reservoir walls let you check water levels at a glance, usually refilling every one to three weeks depending on plant size, pot volume, and ambient humidity.
Benefits of Using Self Watering Systems for Your Houseplants
Consistent moisture is the biggest win. Plants get steady hydration at the root zone, avoiding the feast-or-famine cycle that stresses foliage and stunts growth. Root systems develop more evenly when water availability stays predictable.
Reduced maintenance means less time hovering with a watering can. If you travel frequently, work long hours, or simply have a dozen pots to manage, self watering cuts your routine down to occasional reservoir refills. Low-light tolerant varieties pair especially well with these systems since they often prefer stable, moderate moisture.
Less risk of root rot and fungal issues comes from bottom-up watering. Surface soil stays drier, discouraging fungus gnats and mold. Roots access moisture from below, so you’re not saturating the top layer where pathogens thrive.
Water efficiency improves because the closed reservoir minimizes evaporation. In dry climates or heated winter homes, you’ll use less water overall compared to top watering, where much of the moisture evaporates before roots can take it up.
Finally, self watering systems offer flexibility for mixed collections. You can group thirsty tropical plants and drought-tolerant succulents in the same room, adjusting reservoir size and refill frequency per species without a complex schedule.
Types of Self Watering Systems You Can Use
Self Watering Planters and Pots
Commercially made self watering planters come in two main styles: built-in reservoir pots and insert systems. Built-in models are molded plastic, ceramic, or resin containers with a false bottom that holds water and a central wick or perforated platform. Brands like Lechuza, Mkono, and Bloem offer sizes from 4-inch desktop pots to 18-inch floor planters, with fill spouts and water-level gauges. Expect to pay $15–$60 depending on material and capacity.
Insert kits convert standard pots into self waterers. You nest a smaller growing pot inside a larger cachepot, add a wick or capillary mat between them, and fill the gap with water. Stylish planters with self watering inserts blend function with decor, making them popular for visible spaces like living rooms and offices.
Glazed ceramic self watering pots look sharp but weigh more and cost extra, typically $30–$80 for mid-sized units. Plastic models are lighter, cheaper, and easier to move but may not suit every aesthetic. For large indoor tropical specimens or flowering varieties, choose pots with at least a one-gallon reservoir to reduce refill frequency.
DIY Drip Irrigation and Bottle Methods
If you’re handy or budget-conscious, DIY approaches work just as well. The simplest method: fill a wine bottle or two-liter soda bottle with water, invert it, and push the neck 2–3 inches into the soil. As soil dries, air enters the bottle neck, releasing water slowly. Use a terracotta watering spike adapter (around $8 for a four-pack) for a cleaner look and more controlled flow. This works best for pots 8 inches or larger: smaller containers can get oversaturated quickly.
For multiple plants, a gravity-fed drip line from a five-gallon bucket or reservoir can serve an entire shelf. Use ¼-inch drip tubing, adjustable emitters, and stakes to deliver water to each pot. Expect to spend $20–$40 for tubing, fittings, and 10–15 emitters. Position the reservoir higher than your plants, gravity does the work. This setup suits collections on plant stands or tiered shelving and reduces individual pot maintenance to near zero.
Cotton rope wicks are the most budget-friendly option. Cut ⅜-inch braided cotton clothesline into 12-inch lengths, thread one end through the drainage hole of a plastic nursery pot, coil it inside the root ball, and let the other end sit in a jar or tray of water below. Refill the tray weekly. Total cost: under $10 for enough rope to convert a dozen pots. It’s low-tech, but reliable for budget-friendly houseplants and starter collections.
How to Set Up a Self Watering System: Step-by-Step Guide
Tools and materials you’ll need:
- Self watering planter or DIY components (wick cord, reservoir container)
- Potting mix formulated for houseplants (avoid garden soil, it compacts and blocks capillary flow)
- Plant to be potted or transplanted
- Water (room temperature, dechlorinated if possible)
- Optional: slow-release fertilizer pellets
Step-by-step setup:
- Prep the planter. If using a commercial pot, remove any packaging and check that the wick or water platform is correctly seated. For DIY setups, position your wick cord so at least 6 inches sit in the soil and 4–6 inches dangle into the reservoir.
- Add potting mix to the growing chamber. Fill about one-third full, ensuring the wick extends up into this layer. Use a well-draining, peat- or coir-based mix: avoid heavy clay soils that resist wicking.
- Position the plant. Gently remove it from its nursery pot, loosen circling roots, and center it in the chamber. The root ball should sit at the same depth as before, don’t bury the stem or crown.
- Backfill with soil. Firm gently around roots to eliminate air pockets, but don’t pack hard. Leave about ½ inch below the rim for water overflow during initial top watering.
- Top-water thoroughly the first time. This is critical, pour water from above until it drains through, saturating the entire soil column and priming the wick. It can take 24–48 hours for the wick to fully activate. Some experts at The Spruce recommend this initial soak to establish capillary continuity.
- Fill the reservoir. Use the fill tube or spout to add water until the indicator shows “full” or water reaches the recommended line. For DIY bottle systems, insert the filled, inverted bottle now.
- Monitor for the first week. Check soil moisture by feeling the top inch. If it stays soggy, your wick may be too thick or soil too dense. If it dries out quickly, verify the wick reaches water and isn’t kinked.
- Adjust refill schedule. Most systems need topping off every 1–3 weeks. In hot, dry conditions or for large, leafy plants, check weekly. In cooler, humid months, you might stretch to a month between fills.
Safety and pro tips:
- Wear nitrile gloves when handling potting mix to avoid skin irritation from perlite dust and fertilizers.
- Test the wick before planting by dipping one end in water and holding the other end in dry mix, moisture should climb within a few minutes.
- Avoid overfilling reservoirs: excess water can stagnate and breed mosquitoes or algae. If you see green buildup, flush with a dilute hydrogen peroxide solution (1 tablespoon per gallon).
- For trailing or vining plants like pothos or ivy varieties, self watering pots reduce the risk of dry-out during rapid growth spurts.
Best Plants for Self Watering Systems
Self watering works best for species that prefer consistent, moderate moisture, think jungle understory natives and steady drinkers, not desert cacti.
Top performers:
- Peace lily (Spathiphyllum): Thrives with steady hydration, flags visibly when the reservoir runs dry, making it a good water-level indicator plant.
- Pothos (Epipremnum aureum) and philodendron: Fast growers that appreciate reliable moisture. Vining houseplants like these fill out quickly in self watering setups.
- African violet (Saintpaulia): Prefers bottom watering to keep foliage dry, so self watering pots are ideal. Maintains steady blooms with consistent root-zone moisture.
- Ferns (Boston, maidenhair, bird’s nest): High humidity and even moisture lovers. Self watering reduces the risk of crispy fronds from missed waterings.
- Spider plant (Chlorophytum comosum): Adaptable and forgiving, but grows lushest with regular hydration.
- Calathea and maranta (prayer plants): Tropical foliage plants that sulk in dry soil. Self watering prevents leaf curl and browning edges.
Plants to avoid or use with caution:
- Cacti and succulents: These prefer dry-down periods and well-drained, gritty mixes. Constant moisture invites rot. If you must use self watering, fill the reservoir only partially and use a very coarse, sandy mix.
- Orchids (most types): Epiphytic orchids need air around roots and sporadic soaking. Standard self watering pots keep media too wet. Specialized orchid self watering systems with large bark chunks and minimal wick contact are available but niche.
- Snake plant (Sansevieria) and ZZ plant (Zamioculcas): Drought-tolerant species that rot easily in consistently moist conditions. Better suited to traditional pots with infrequent watering.
Before committing a plant to self watering, check its native habitat and moisture preference. Rainforest dwellers adapt quickly: desert and arid-region species struggle. Resources like Better Homes & Gardens offer plant-specific watering guides to cross-reference.